

Being a business owner, you must know that data is the backbone of any business. Be it customer records and financial data to applications and internal documents, everything depends on digital storage today. But keeping data and digital means can also be risky because once your data is lost, you cannot recover it. The problem is simple data is also fragile. A system crash, accidental deletion, ransomware attack, or even human error can cause major losses.
But not anymore because this is where Microsoft Azure Backup plays an important role. Instead of depending on physical drives or manual backup systems, Azure Backup gives you the freedom to store data safely in the cloud and restore it whenever you need. It is commonly used in modern IT businesses nowadays because it reduces dependency on hardware and improves recovery speed.
What is Azure Backup?
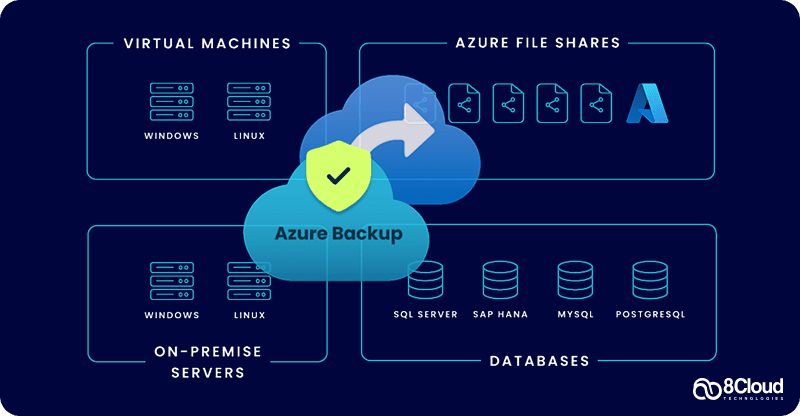
Azure Backup is a cloud-based service provided by Microsoft that automatically backs up and restores data from cloud and on-premises environments. It creates a secure copy of your data and stores it in Microsoft’s cloud environment so it can be recovered later if something goes wrong. At the center of this system is something called a Recovery Services Vault, which acts like a secure storage container for all backup data. This vault is one of the most important components in any azure backup setup step by step guide, because without it, backups cannot be stored or managed.
It works across:
- Virtual machines (VMs)
- Databases
- File systems
- On-prem servers
- Azure workloads
Learn How Azure Backup Works
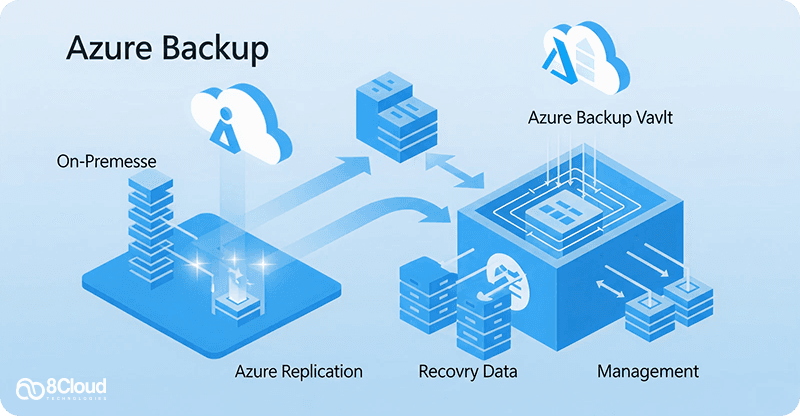
Before jumping into configuration, it is important to understand how the system actually works in real time. Azure Backup follows a structured flow. First, a backup policy is created. This policy decides when backups should run, how often they should happen, and how long data should be stored. Once the policy is applied, Azure automatically creates a backup agent or extension depending on the workload. After that, data is copied from your system and securely transferred to Azure’s cloud storage. This data is encrypted both during transfer and while stored. Finally, restore points are created, which allow businesses to recover data at specific points in time. This process runs automatically once configured, which is why many companies use Microsoft Azure backup setup instead of traditional manual systems.
Step 1: Creating a Recovery Services Vault
The first step in azure backup configuration guide is creating a Recovery Services Vault. This vault is the main storage location where all backups will be stored. To create it, you go to the Azure Portal and search for “Recovery Services Vault.” After selecting it, you click create and fill in the required details. The region selection is very important because it decides where your data will physically reside. Most businesses choose the same region where their applications are running to reduce latency and avoid unnecessary transfer costs. Once created, the vault becomes the central control point for all backup operations.
These include:
- Subscription
- Resource Group
- Vault Name
- Region
Step 2: Understanding Vault Importance in Azure Backup Process
Many beginners think the vault is just a storage folder, but it is actually much more than that. The Recovery Services Vault manages backup schedules, security settings, retention rules, recovery points, and access permissions. It is also responsible for controlling backup consistency across different workloads. Without a properly configured vault, the entire azure backup process explained becomes incomplete or unstable.
Step 3: Choosing the Right Backup Scope
After creating the vault, the next step is deciding what you want to back up. Each workload behaves differently, so selecting the right scope is important. For example, a small business running a website on a virtual machine will focus on VM backup, while an accounting firm may prioritize database backup. This flexibility is one reason why Azure is widely used in azure backup for beginners scenarios.
Azure allows multiple options such as:
- Virtual machines
- Databases like SQL Server
- File shares
- On-premises servers
Step 4: Connecting Resources to Azure Backup
Once the scope is selected, the next step is connecting your resources to Azure. If you are backing up a virtual machine, Azure installs a backup extension automatically. This extension helps communicate between the VM and the vault. For on-prem systems, a backup agent is installed that sends data securely to Azure. This connection ensures that backups happen automatically based on your policy settings without manual intervention.
Step 5: Configuring Azure Backup (Core Setup Stage)
Once your Recovery Services Vault is created and your resources are connected, the next stage in the azure backup setup step by step guide is configuration. This is where you actually decide how Azure will protect your data on a daily basis. To start configuration, you open the Recovery Services Vault and select the “Backup” option. Azure will then ask you to choose what you want to protect, such as virtual machines, databases, or file shares. This step is important because Azure does not apply a one-size-fits-all backup approach. Instead, it adjusts the backup method depending on the workload type. This flexibility is one of the reasons businesses prefer Microsoft Azure backup setup over traditional tools.
For example:
- A virtual machine backup captures the full system state
- A database backup focuses on transaction consistency
- A file share backup tracks file-level changes
Step 6: Creating a Backup Policy
A backup policy is the heart of the entire Azure Backup system. It controls when backups happen, how often they run, and how long data is stored. When people search for how to configure Azure Backup, this is usually the step they are trying to understand. This flexibility allows Azure Backup to support both small and enterprise environments. A good rule is to match your backup frequency with how often your data changes. More changes mean more frequent backups.
A typical backup policy includes:
- Backup schedule (daily, weekly, or hourly)
- Retention period (how long backups are stored)
- Time of backup execution
- Recovery point frequency
For example, a small business might set:
- Daily backup at midnight
- Retain data for 30 days
While a larger business might choose multiple backups per day and retention of 90 days or more.
Step 7: Understanding Azure Backup Storage Options
Storage plays a major role in azure backup configuration guide because it directly affects cost and performance. Most small businesses start with LRS or GRS depending on budget and risk level. Choosing the right storage type is important because it cannot be changed easily after backups begin.
Azure Backup offers different storage redundancy options:
- 1. Locally Redundant Storage (LRS): This stores your data within a single data center. It is cost-effective but less resilient.
- 2. Zone Redundant Storage (ZRS): This replicates data across multiple zones in the same region for better reliability.
- 3. Geo-Redundant Storage (GRS): This is the most secure option. It copies your data to a secondary region, protecting against regional failure.
Step 8: Allowing Backup for Virtual Machines
Now we move into the actual activation of backup protection. If you are backing up a virtual machine, Azure will install a backup extension automatically. This extension helps connect the VM to the Recovery Services Vault. Once enabled, Azure will take an initial full backup, create incremental backups afterward, and store recovery points based on policy. This process runs automatically in the background. One important thing to remember is that the first backup usually takes longer because Azure copies the full dataset. After that, only changes are saved, which reduces cost and time.
Azure Backup Process in Real Use
Once everything is set up, the backup process becomes automatic. This cycle continues based on the policy you set. This automation is why businesses prefer Azure over manual backup systems, especially when managing multiple servers or workloads.
Here is how it works in real life:
- Azure checks the backup schedule
- It identifies changes since last backup
- It creates a snapshot or incremental copy
- Data is encrypted and sent to the vault
- A recovery point is created
Process of Azure Backup Restore
A backup is only useful if recovery works properly. Azure makes restoration simple. When data is lost, deleted, or corrupted, you can restore it from a recovery point. This flexibility ensures businesses can recover quickly without long downtime.
The restore process usually involves:
- Selecting the Recovery Services Vault
- Choosing the backup item (VM, file, database)
- Selecting a restore point
- Choosing restore location
- Confirming recovery
Azure allows:
- Full system restore
- File-level restore
- Point-in-time database recovery
Azure Backup Security Features
Security is built into every layer of Azure Backup. These features make Azure Backup strong against ransomware attacks and accidental deletions. For industries like finance, healthcare, and e-commerce, this level of protection is extremely important.
Some key protections include:
- Data encryption in transit and at rest
- Role-based access control (RBAC)
- Soft delete protection (prevents accidental loss)
- Multi-user authorization for critical actions
Common Azure Backup Mistakes Businesses Make
Even though setup is simple, many businesses still make avoidable mistakes. These mistakes often lead to higher costs or weak recovery planning.
Some of the most common include:
- Choosing wrong storage type
- Not setting proper retention rules
- Forgetting to test restore process
- Running unnecessary frequent backups
- Not monitoring backup reports
Azure Backup Troubleshooting Basics
If something goes wrong, most issues are easy to fix. Azure provides logs inside the Recovery Services Vault, which helps identify the exact issue. Most backup failures are related to configuration, not system errors.
Common problems include:
- Backup agent not installed properly
- Network connectivity issues
- Insufficient storage quota
- Incorrect policy configuration
Azure Backup Best Practices for Businesses
Once your backup system is running, the real value comes from how well you manage it over time. Following azure backup best practices ensures your data stays safe without unnecessary cost or complexity. One of the most important practices is to define clear backup policies based on data importance. Not all data needs the same level of protection. This simple classification helps avoid overpaying for storage while keeping important data safe. Another key practice is regular monitoring. Azure provides backup reports inside the Recovery Services Vault. Ignoring these reports is one of the most common reasons for backup failures going unnoticed.
For example:
- Critical business databases → frequent backups + long retention
- HR or internal documents → moderate backups
- Temporary files → minimal or no backup
Businesses should check:
- Backup success rate
- Failed jobs
- Storage usage trends
Explore Azure Backup Pricing Basics
Understanding azure backup pricing basics is important before full deployment. Azure Backup does not have a fixed monthly price. Instead, it follows a usage-based model. The more frequently you back up, and the more data you store, the higher the cost. However, Azure is often cheaper than traditional backup systems because no physical hardware is needed, there are no maintenance costs, and no separate backup software licenses. This makes it attractive for SMBs comparing azure vs aws for small business, especially when cost control is important.
You are mainly charged for:
- Amount of data stored
- Storage type (LRS, ZRS, GRS)
- Number of protected instances
- Backup frequency
- Data recovery operations

Why Azure Backup is Better Than Old Backup Systems
Traditional backup systems rely on physical storage devices or local servers. Azure Backup removes these limitations by moving everything to the cloud. This is why many companies compare azure backup vs traditional backup when modernizing their IT systems.
Traditional systems have multiple limitations such as:
- Risk of hardware failure
- Manual backup process
- Limited storage capacity
- Difficulty in remote recovery
- High maintenance cost
Cloud backup ensures:
- Automatic scheduling
- Remote recovery access
- Scalable storage
- Built-in security

Azure Backup Optimization Tips for SMBs
Small and medium businesses often worry about cost, so azure backup pricing basics must be managed carefully. These simple steps can reduce azure backup cost optimization tips impact significantly.
Here are practical ways to reduce unnecessary cost:
- Use Incremental Backups: Azure automatically supports incremental backups, but ensuring your configuration is optimized reduces storage usage significantly.
- Set Proper Retention Periods: Many businesses keep backups longer than needed. For example, keeping 180-day backups for non-critical data increases cost unnecessarily.
- Clean Unused Backups: Old or unused backup items should be removed from the vault.
- Choose Right Storage Tier: LRS for budget-friendly backup, GRS for disaster protection. Avoid overusing GRS unless required.
Quick Comparison Of Azure Backup vs Traditional Backup
This comparison shows why modern businesses are shifting toward Microsoft Azure backup setup instead of physical systems.
Conclusion
Setting up Azure Backup is not just about turning on a feature. It is about building a reliable, automated protection system for your business data. For SMBs, Azure Backup is one of the most practical and cost-efficient cloud protection solutions available today. While traditional backup systems still exist, cloud-based systems like Azure clearly offer better flexibility, stronger security, and simpler management.
When done correctly, azure backup setup step by step guide helps businesses:
- Reduce data loss risk
- Improve recovery speed
- Control storage costs
- Maintain compliance
- Avoid dependency on manual systems

Ready To Protect Your Business Data With Azure Backup?
Every project has different needs — from performance and scalability to budget and ease of use. Let us help you make the right choice.